You spotted dark spots on the drywall in your Troy home — maybe after a basement flood, a slow pipe leak behind the vanity, or a window that never quite sealed right through the winter. Now you’re wondering how bad it is, whether the HEPA vacuum you have in the garage is enough, and who to call if it isn’t. Here’s what you need to know, in the order you need to know it.
Mold begins colonizing wet drywall within 24 to 48 hours of a moisture event. That window is not a scare tactic — it’s basic biology, and it’s exactly why Troy homeowners who catch a water loss early and act fast avoid the jobs that run into the tens of thousands. Our mold remediation services are available 24/7, and a certified crew is dispatched to your Troy address as soon as you call. If you’re in an active loss right now, call (888) 838-7170 and read this while we’re on the way.
This guide is built for Troy homeowners specifically. We’ll walk through the science of why mold moves so fast here, how to prepare and contain safely, the correct HEPA vacuum protocol, what a professional mold remediation specialist actually does differently, and the mistakes that turn a small job into a demolition project. For a broader overview of the removal process across Southeast Michigan, see our complete Mold Removal in Michigan guide.
Why Mold Starts in 24–48 Hours on Wet Drywall in Troy Homes
Troy sits in Oakland County’s humid continental climate zone. Winters are cold enough to freeze pipes — January lows regularly drop into the single digits during polar vortex events — and summers bring high humidity that keeps relative indoor moisture elevated for months. That thermal swing is hard on homes built in the 1970s, ’80s, and ’90s, which make up a significant share of Troy’s residential stock. Older vapor barriers, unsealed rim joists, and original plumbing fittings create the conditions mold needs: organic material (drywall paper and wood framing), ambient warmth, and moisture.
Mold spores are always present in indoor air at low levels. When water contacts drywall, the paper facing becomes a food source within hours. By 24 hours, the mycelium network is establishing. By 48 to 72 hours, visible colonies appear and spore counts in the air begin to rise. The EPA’s guidance on mold and moisture is clear: any wet porous material that cannot be dried completely within 24 to 48 hours should be treated as potentially contaminated.
The most common mistake Troy homeowners make is pointing a box fan at wet drywall and assuming the problem is solved when the surface feels dry. What we see in the field — consistently — is that a moisture meter reads 25 to 40 percent moisture content behind drywall that looks and feels completely dry to the touch. That trapped moisture is exactly where mold establishes first, hidden inside the wall cavity where air circulation can’t reach it. By the time you see discoloration on the paint surface, the colony behind the drywall is typically weeks old.
Step 1: Assess the Situation and Decide Your Role (First 10 Minutes)
Before you touch anything, make two decisions: Is this a DIY-manageable situation, or is it a professional job? And is it safe to be in the space right now?
When to call a pro immediately and not DIY:
- The mold-affected area covers more than 10 square feet (roughly a 3×3 patch). The EPA uses this as the threshold for recommending professional remediation.
- You have visible mold inside HVAC ducts, air handlers, or ductwork — spores will distribute to every room the system serves.
- The affected area is wet and near your electrical panel, outlets, or wiring. Standing water and electrical systems are a life-safety emergency. Do not enter. Call us.
- Anyone in the household has asthma, a compromised immune system, or is under 12 or over 65. Elevated spore counts are especially dangerous for these groups.
- You smell mold but cannot locate the source. Hidden mold behind walls or under subfloor requires thermal imaging and moisture mapping to locate safely.
If the situation appears manageable and safe to enter:
- Shut off any water source still feeding the moisture problem.
- Turn off the HVAC system. Running forced air spreads spores to unaffected rooms.
- Do not use a leaf blower, shop vac without a HEPA filter, or any tool that creates airflow across mold — you will aerosolize spores throughout the space.
- Open a window in the affected room only — not throughout the house — to provide some air exchange while you work.
⚠️ Safety warning: Never use bleach on porous surfaces like drywall or unfinished wood. Bleach kills surface mold but cannot penetrate porous materials, and the moisture in the bleach solution feeds the colony underneath. For more on why common DIY approaches fall short, read Mold Removal Using Vinegar: What It Actually Does (And When to Call a Pro).
Step 2: Prepare for Mold Remediation — Gear and Containment (First 30 Minutes)
Proper preparation is not optional. Skipping containment is the single mistake most likely to turn a localized mold problem into a whole-house remediation project.
Personal protective equipment you need before entering the work area:
- N-95 respirator at minimum. An N-100 or P-100 half-face respirator is significantly better for any visible mold growth. A dust mask is not sufficient.
- Safety goggles (not glasses — goggles that seal around the eyes).
- Nitrile gloves, minimum 12-mil thickness for handling moldy materials.
- Disposable Tyvek suit or dedicated clothing you will bag and wash immediately at high heat.
Containment setup:
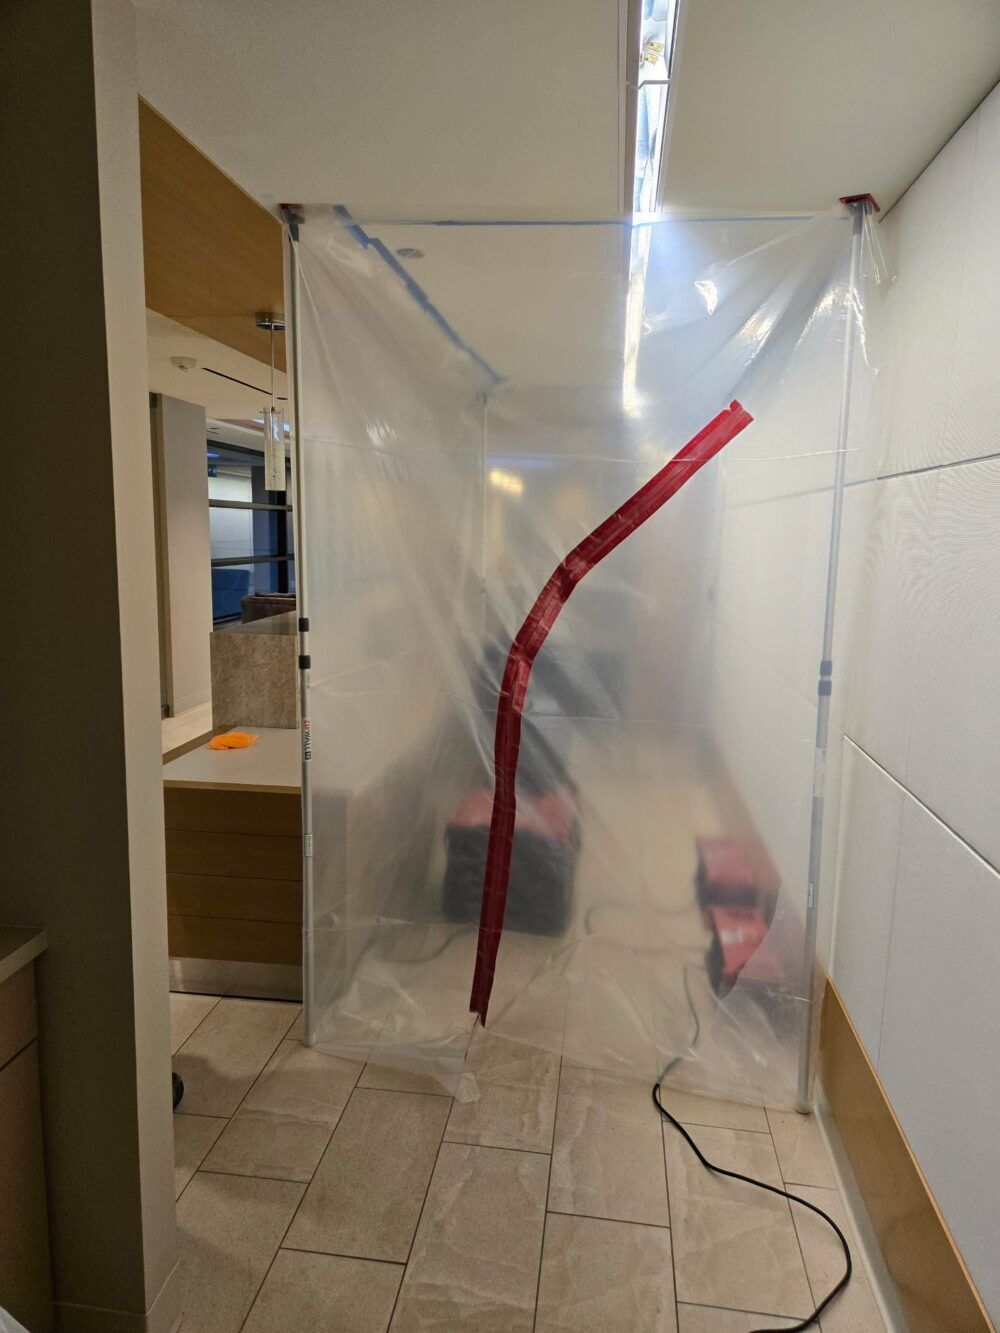
- Seal the doorway to the affected room with 6-mil poly sheeting and painter’s tape. If the room has an HVAC register, cover it with poly and tape.
- Create negative air pressure in the work zone if possible: a box fan exhausting through the window, sealed around the edges with poly, pulls contaminated air out rather than letting it drift into adjoining rooms.
- Place heavy-duty contractor bags (3-mil minimum) inside the room before you start — you will not be carrying contaminated materials through the rest of your home.
Documentation before you start (critical for insurance):
- Photograph every affected surface from multiple angles before moving anything. Use a flashlight to show depth and discoloration clearly.
- Note the date and time of each photo. If your loss is covered under your homeowners policy, timestamp documentation is what adjusters ask for first.
- Write down when you first noticed the moisture event and what caused it (pipe burst, storm intrusion, appliance failure). This establishes the timeline for the claim. For guidance on what Michigan policies typically cover, see our overview of Mold Insurance Michigan.
Step 3: The HEPA Vacuum Protocol — Step-by-Step (First Hour)
A true HEPA vacuum filters particles down to 0.3 microns — small enough to capture mold spores, which typically range from 2 to 100 microns. A standard shop vac exhausts spores back into the air. If your vacuum does not say HEPA-certified on the filter housing, do not use it for mold remediation.
Surface-by-surface HEPA vacuum sequence:
- Ceiling first, then walls, then floor. Always work top to bottom so dislodged spores fall onto surfaces you haven’t cleaned yet, not ones you have.
- Use a soft brush attachment on the vacuum nozzle. Hold it 1 to 2 inches from the surface — close enough to capture spores, far enough not to abrade and aerosolize.
- Work in overlapping, slow passes. Do not rush. Spores dislodged and not captured are spores that resettle somewhere else.
- After vacuuming, wipe hard non-porous surfaces (concrete block, tile, metal) with an EPA-registered fungicide or a solution of 1 cup of water and 1 tablespoon of unscented dish soap, then dry immediately.
- Porous materials — drywall, insulation, wood framing with visible mold penetration — cannot be cleaned. They must be removed and bagged. HEPA vacuuming porous materials is a surface measure only; it does not eliminate the colony inside the material.
- Double-bag all removed material in 3-mil contractor bags. Seal each bag with tape before carrying it out of the containment zone.
- After the work area is cleared, HEPA vacuum the entire space one more time before removing your poly containment barriers.
- Change your gloves before touching the outside of the poly barriers when you take containment down — the outside of the barriers is clean; treat it that way.
⚠️ What HEPA vacuuming cannot do: It cannot locate mold hidden behind intact drywall. It cannot test air quality to confirm remediation is complete. It cannot address the moisture source that caused the growth in the first place. For any of those — and for any job over 10 square feet — a certified mold remediation specialist is the right call.
When we responded to a mold job in Troy (reference: mold-jobs-01), our IICRC-certified technicians used thermal imaging cameras alongside HEPA extraction equipment to map moisture behind walls that appeared visually clean. What looked like a contained surface problem in the bathroom extended into the adjacent bedroom wall cavity — a detail that a HEPA vacuum alone would never have revealed, and that a visual inspection would have missed entirely.
What to Expect from a Mold Remediation Specialist in Troy
When a DriForce crew arrives at your Troy home, the first thing we do is not vacuum. It’s assess. Our IICRC Mold Remediation certified and MII (Mold Inspection Institute) certified technicians conduct a full moisture mapping inspection using thermal imaging cameras and calibrated moisture meters to identify every wet zone — including the ones behind drywall, under flooring, and inside wall cavities that look fine from the outside.
From there, the professional remediation process follows IICRC S520 protocol:
- Containment engineering: We build proper negative-air containment using poly barriers and industrial HEPA negative-air machines — not a box fan in a window. This keeps spore counts in unaffected areas of your home from rising during the work.
- Controlled demolition: Porous materials that cannot be cleaned are removed surgically to minimize the scope of your eventual rebuild. We document everything removed for your insurance claim.
- HEPA extraction and surface treatment: Commercial-grade HEPA vacuums with sealed, certified filters, followed by EPA-registered antimicrobial treatment on all affected framing and hard surfaces.
- Structural drying: If the moisture source is recent, we deploy industrial dehumidifiers rated at 200 pints per day and air movers to bring structural moisture levels back to normal range before reconstruction begins. This step is frequently skipped by non-certified contractors — and it’s why mold comes back.
- Post-remediation air quality testing: We verify the work with air sampling before we pull containment. You receive documentation suitable for your insurance carrier.
If the mold loss was triggered by water damage — a burst pipe, a sump pump failure, or a roof leak — our team handles water damage restoration as part of the same response, so you’re not coordinating between multiple contractors while your home is open to the weather. When the remediation is complete, our reconstruction team handles the rebuild after remediation — drywall, insulation, paint, and finish work — so you have one point of contact from emergency call to finished room.
For more guidance on evaluating your options, read How to Choose a Mold Remediation Specialist in Troy (Before Mold Spreads to Your Studs). And if you’re comparing local companies, our guide to Choosing a Mold Removal Company walks through the questions worth asking before you sign anything.
Common Mistakes to Avoid During Mold Remediation in Troy
1. Running the HVAC system while mold is present. Your forced-air system will distribute spores to every room it serves within hours. The first thing to do when you discover mold is shut the system off and keep it off until remediation is complete and air quality is verified.
2. Using bleach on drywall or wood. Bleach is effective on non-porous surfaces like tile. On drywall, wood studs, or OSB sheathing, the water carrier in bleach penetrates deeper than the sodium hypochlorite active, feeding moisture to the colony below the surface. This is one of the most persistent myths in DIY remediation and one of the most expensive mistakes homeowners make.
3. Skipping containment because “it’s just a small area.” A 2-square-foot patch of visible mold can produce millions of spores. Without poly barriers and negative-air pressure, those spores are in your living room before you’re done working.
4. Painting over mold. Encapsulant paint is a legitimate final step in a professional remediation process — applied to clean, dry framing after certified treatment. It is not a substitute for remediation. Paint applied over active mold will peel within weeks and the colony continues to grow underneath.
5. Not addressing the moisture source first. Remediating mold without fixing the underlying moisture problem guarantees recurrence. Whether it’s a failed window seal, a negative-grading issue along the foundation, or a slow drip at a pipe joint, the moisture source must be corrected before or during remediation — not after. The Indoor Air Quality Association consistently identifies unresolved moisture as the primary driver of remediation callbacks.
6. Assuming your homeowners policy won’t cover it without checking. Mold coverage in Michigan varies significantly by carrier and policy language, but many losses are partially or fully covered — particularly when mold results from a sudden, accidental water event like a burst pipe. We work directly with all major carriers including Allstate, State Farm, Liberty Mutual, Auto-Owners, AAA, and Travelers, and we handle the documentation and adjuster coordination. Don’t assume coverage is off the table before we review the loss with you.
If you’re uncertain about what your air purifier can and can’t do during this process, our guide to Mold Removal Air Purifiers in Troy, MI: What Actually Works (And What a Pro Does Instead) clears up the most common confusion homeowners have about filtration equipment.
Next Steps for Troy Homeowners
If you’re reading this because you found mold today, the most important thing you can do in the next ten minutes is stop the air movement in your home, document what you see, and call a certified specialist if the affected area is larger than 10 square feet, is near electrical systems, or if you cannot identify where the moisture is coming from. Time matters in a way that most other home problems don’t — every hour the colony grows, the remediation scope expands.
DriForce has been responding to mold losses across Troy and Oakland County since 2009. Our Troy service page outlines the full scope of what we handle in this area. Whether your situation calls for a targeted HEPA remediation or a full moisture investigation with structural drying, our IICRC-certified crew brings the right equipment and the right credentials to close the job correctly the first time.
Our crews live and work here in Southeast Michigan too — we know what a Troy January does to plumbing and what a wet Oakland County summer does to basements, because we’re in those basements every week. If you’re dealing with mold right now, call us at (888) 838-7170 — we answer 24/7, we dispatch crews across Oakland, Wayne, Macomb, and St. Clair counties, and we bill your insurance carrier directly so you’re not fronting the cost while your claim is processed.
